Google Drive When I Upload a Folder the Files Are Missing
Photograph by Guido Klinge on Unsplash
Google Drive is a storage service bachelor for Google users and allows you to shop all kinds of files. All users have 15GB for gratis after created their Google account, and all yous need to do is log in at https://drive.google.com then upload your files inside. For avant-garde users (developers), at that place is an API available to programmatically performs actions like Create a folder, add a file, search files, etc... It can be useful in some cases:
- Backup your database and upload it to your bulldoze
- Set a Cron task to look upward within a binder and upload the files inside
- Receive an email when you reach the storage threshold
- Delete all files older than a specific date
Our goal
Here is the goal we desire to achieve: We have a .jpg file on our server, and we want to upload it into our Google Bulldoze within a folder named Motion-picture show. If the binder doesn't be, nosotros will create information technology, and finally, when the file is successfully updated, delete the file on the server.
Go API Credentials
The first step is to get our Google Drive credentials which are:
- A Client Id and a Client Secret
- A redirect URI and refresh token
You need to have a Google account for the steps beneath:
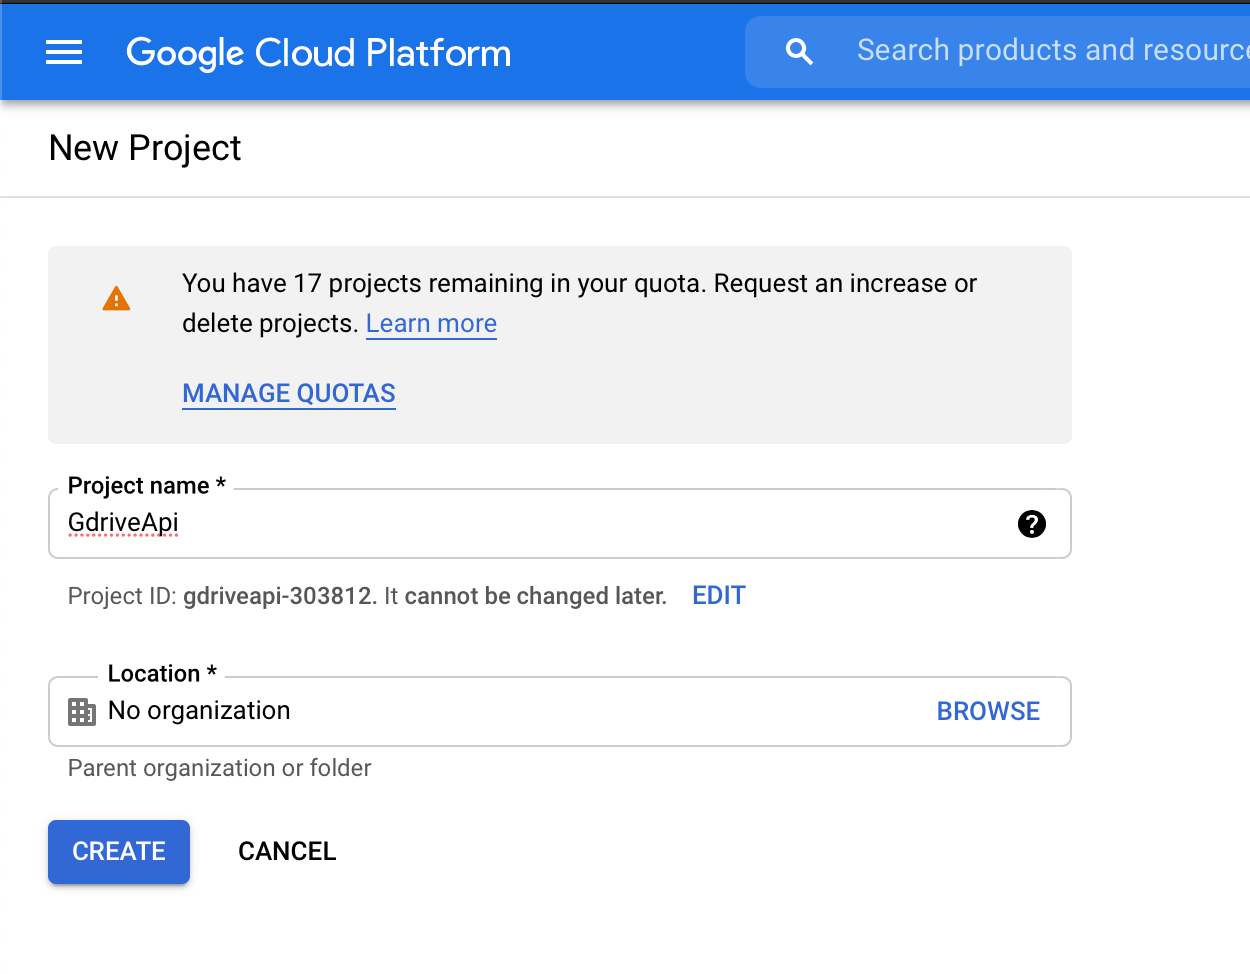
- Become to https://console.cloud.google.com/cloud-resources-manager and click on the button "Create Projection". Give a proper name to the projection, click on "Create" to submit, and when for the cosmos to complete.
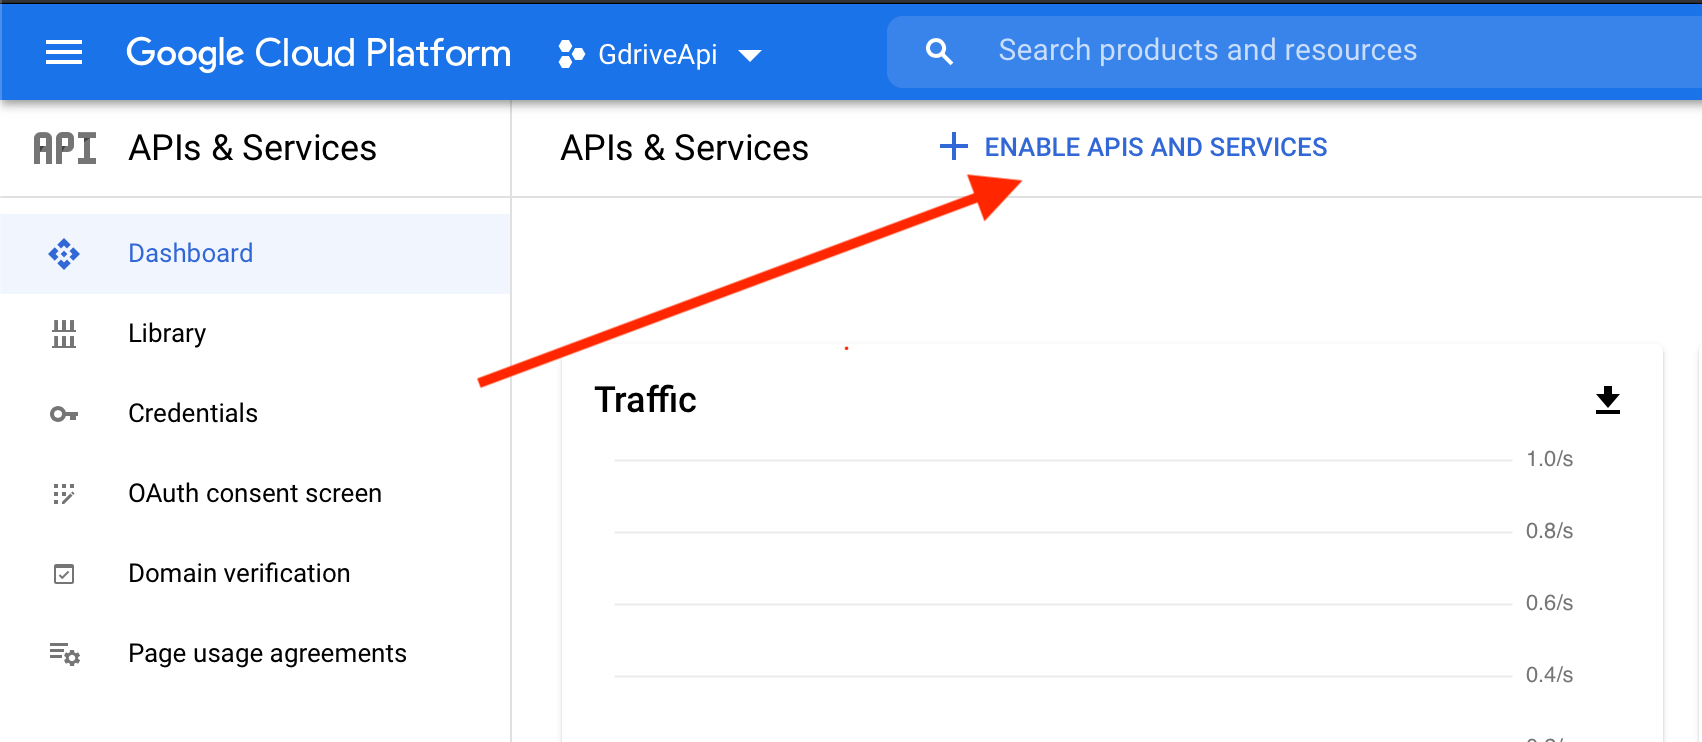
2. Once the project is created, select it. You will be redirected to the console dashboard. On the sidebar menu, click on the carte du jour "APIs & Services".
Locate the button labeled "ENABLE APIS AND SERVICES" and click on information technology.
iii. You will be redirected to a folio that lists all the Google APIs. Search for Google Bulldoze API and click on it in the results list. On the next folio, click on the button "Enable", you will be redirected to a page when the API will be enabled.
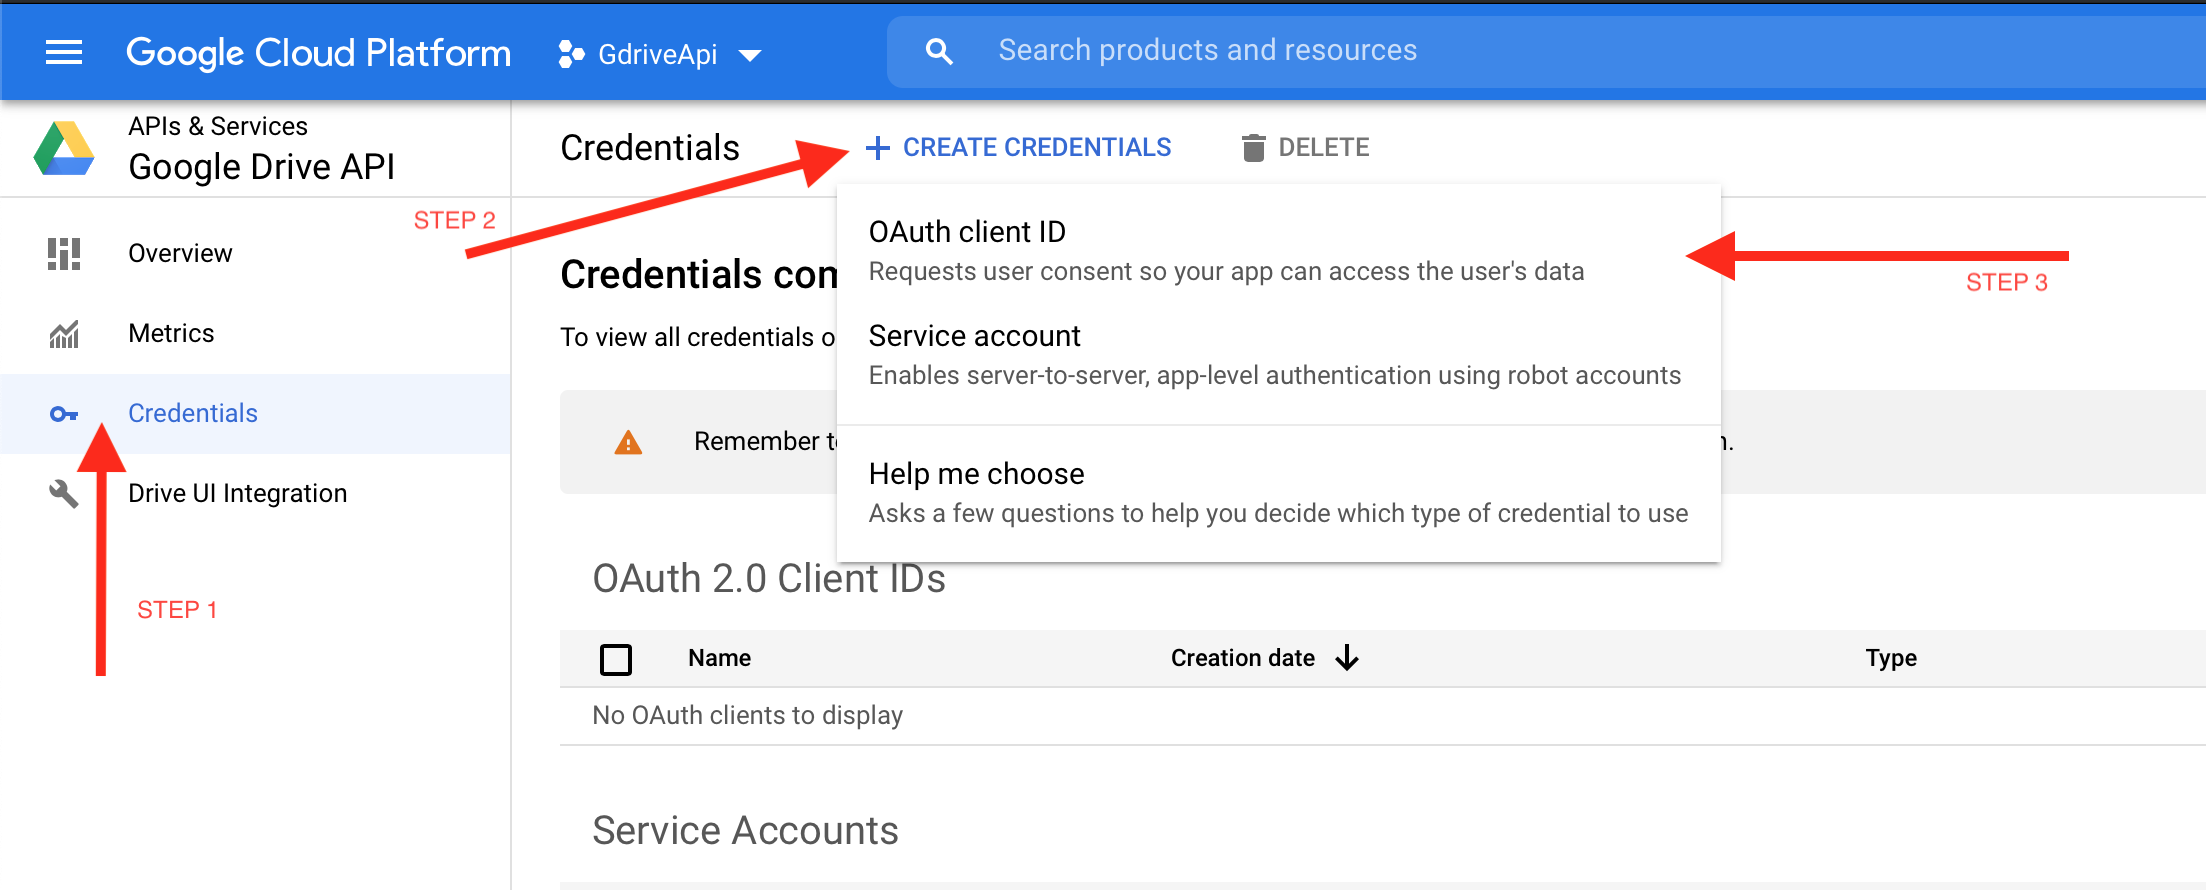
four. On the new page, click on the carte du jour in the sidebar labeled "Credentials". On the side by side page, locate the drop-down button labeled "CREATE CREDENTIALS" click on it and select the drib-down bill of fare labeled "OAuth client ID"
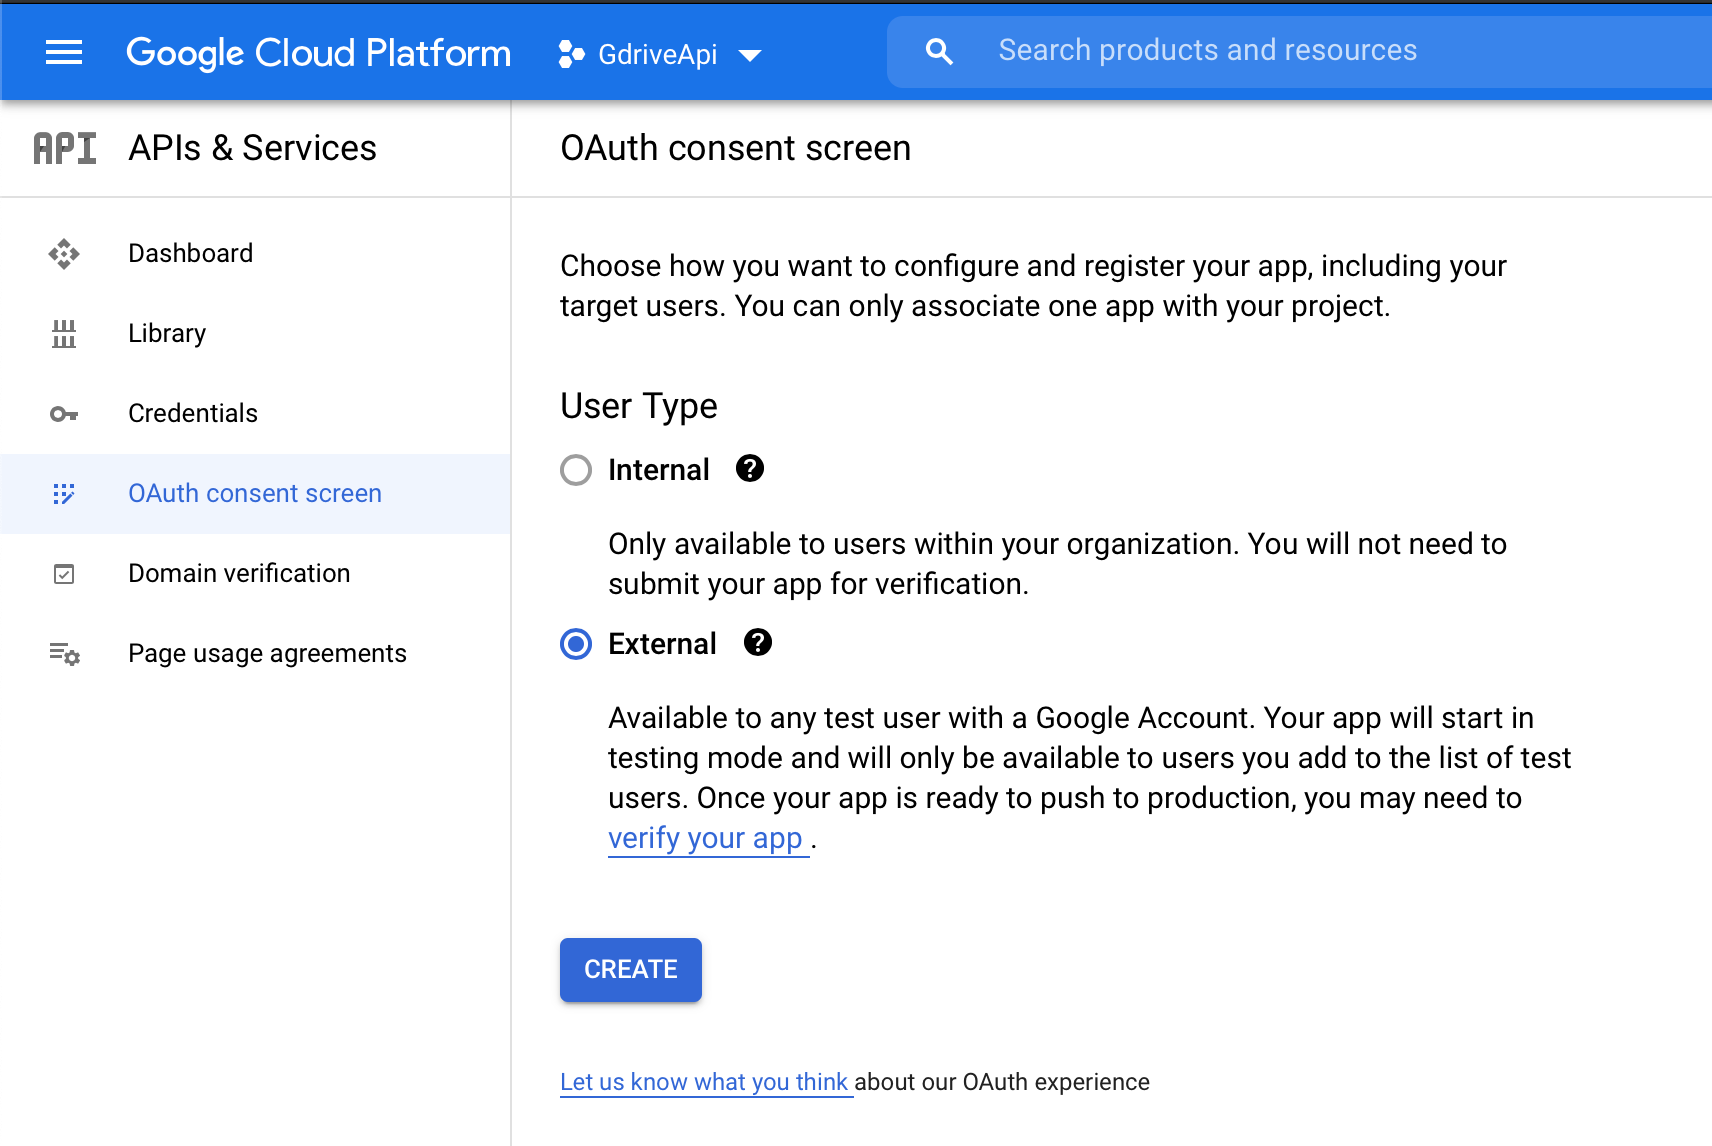
5. On the new page, click on the button "CONFIGURE CONSENT SCREEN" and then cheque "External" for the User Blazon. Yous can select "Internal" if the business relationship y'all use is inside an organization which is not my example. Click on the push button "Create"
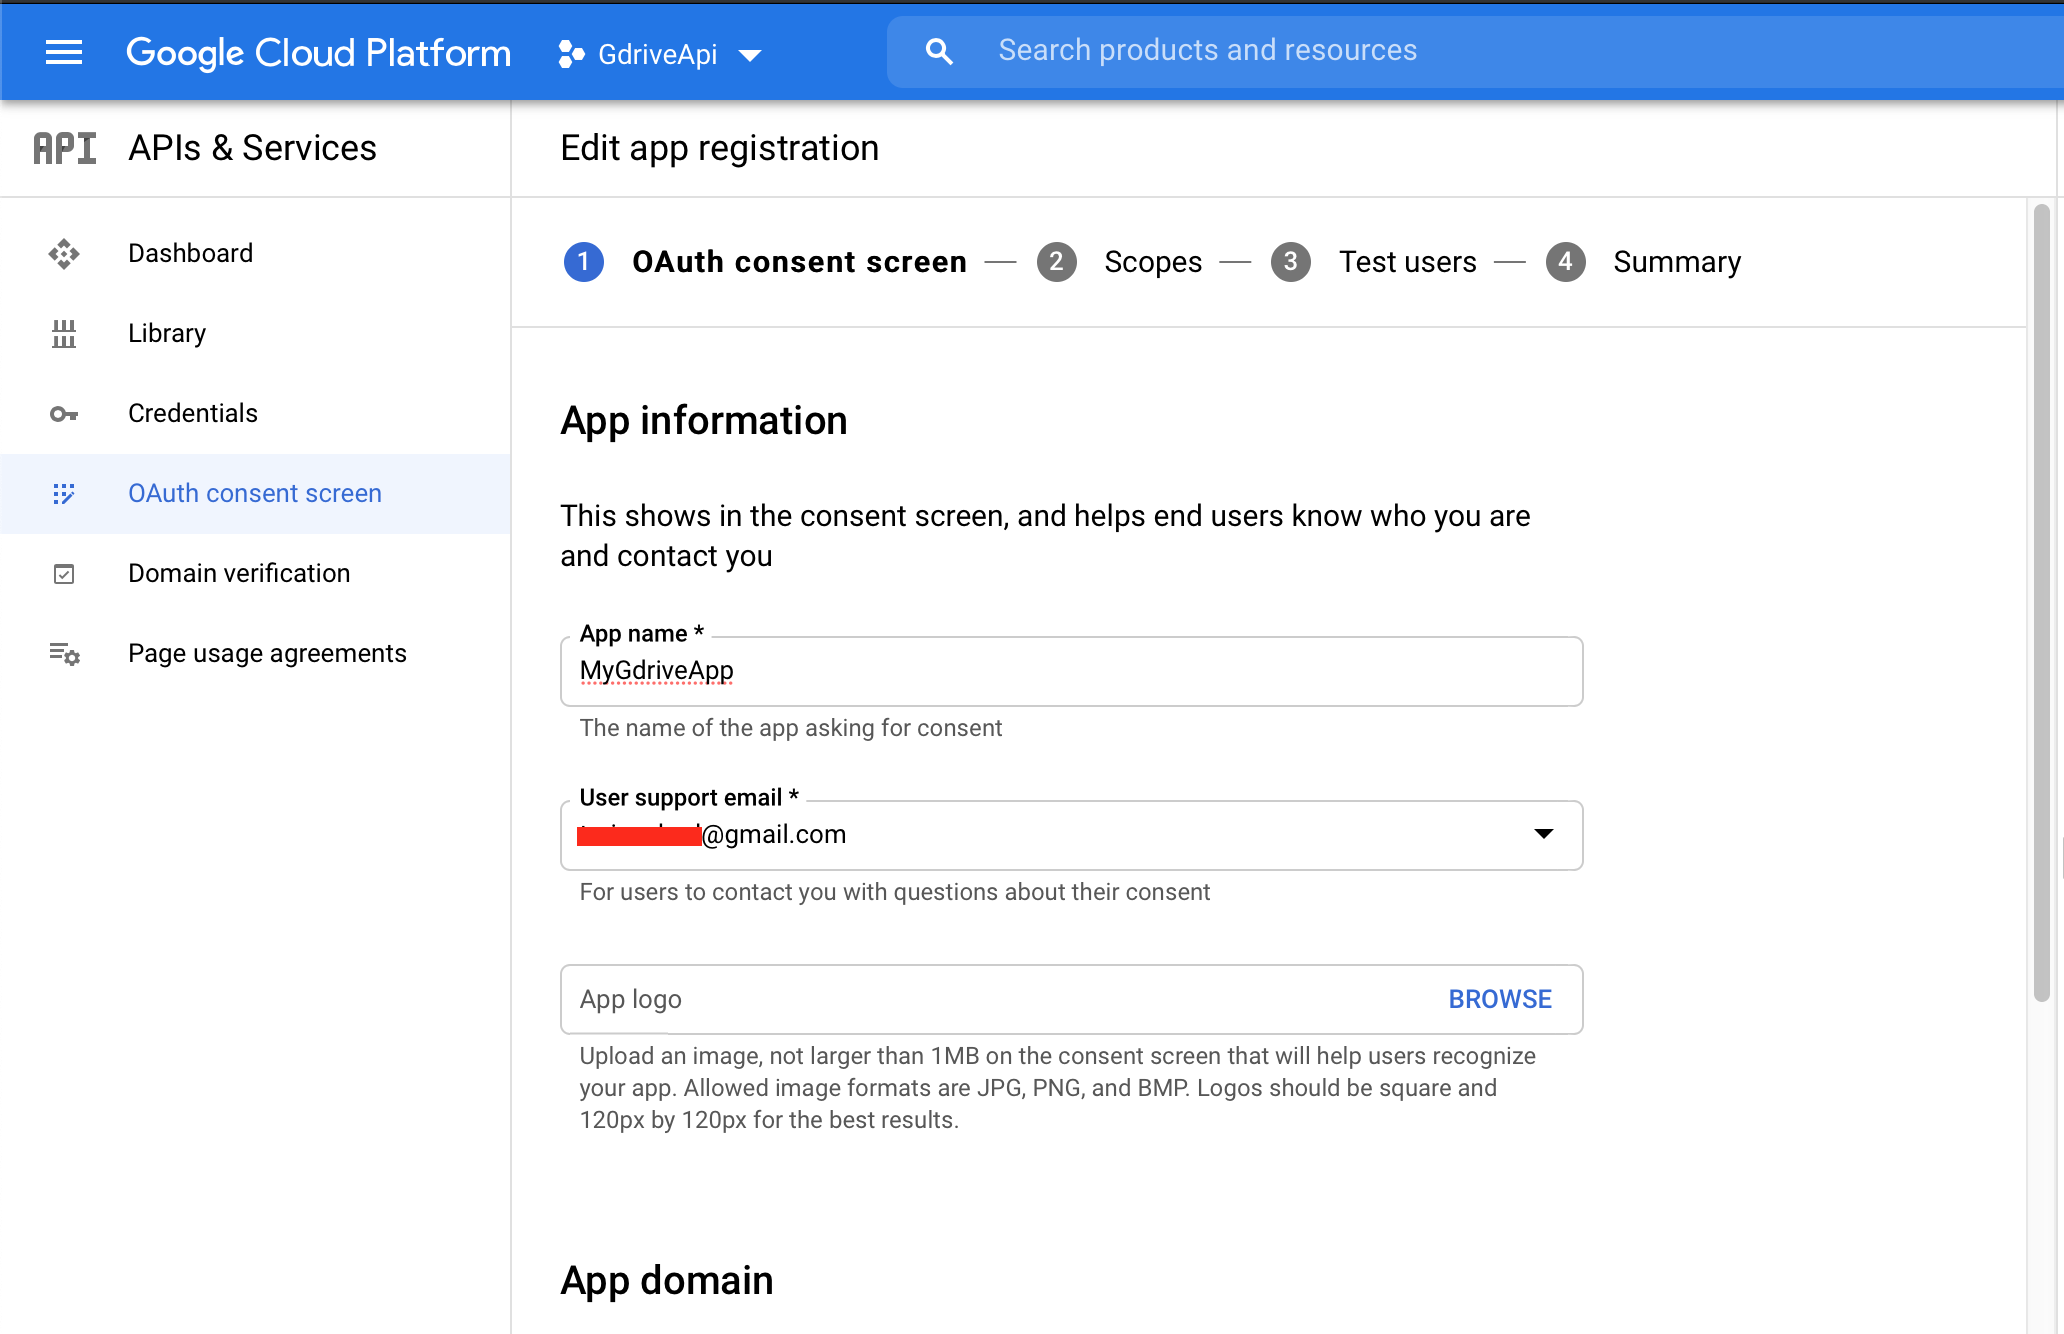
On the new page, we accept a page with iv steps.
In stride i, requite your awarding the name and select your email address as the value for the input labeled "User support email". Also, requite your email accost as value for input labeled "Programmer contact information". You lot can ignore other inputs since they aren't mandatory. Click on "Save and Go on"
On pace 2, no change to do, and so click on "Save and Continue."
In step iii, add a Examination user with your electronic mail accost. Note that you can add up to 100. Click on "Save and Continue"

Step 4 is just a summary of the previous steps. Click on the push button "Back TO DASHBOARD."
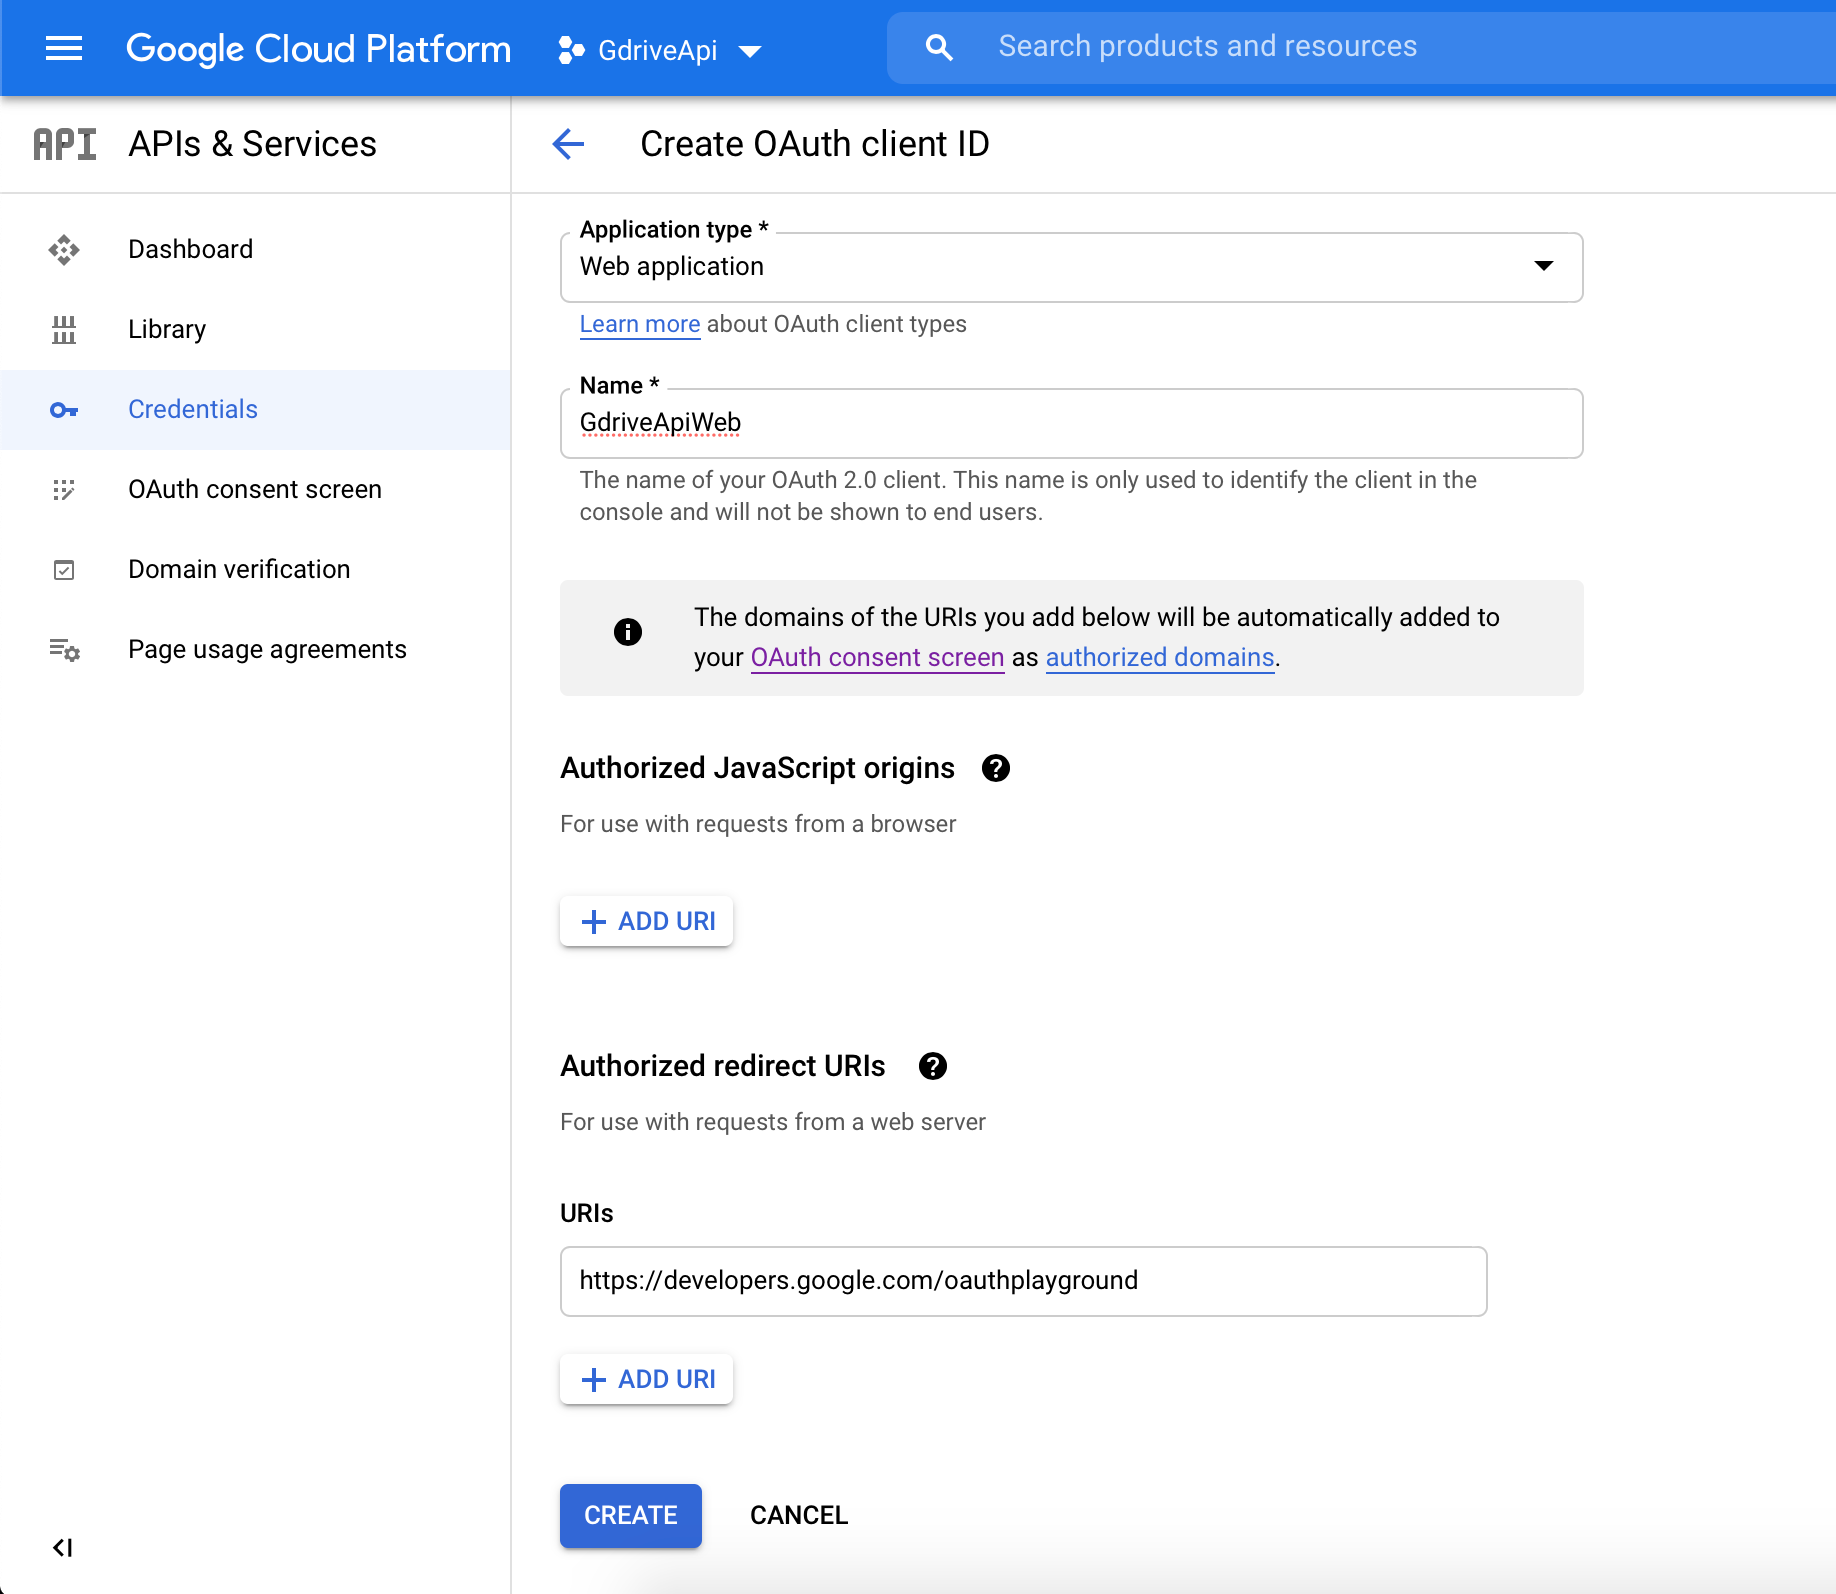
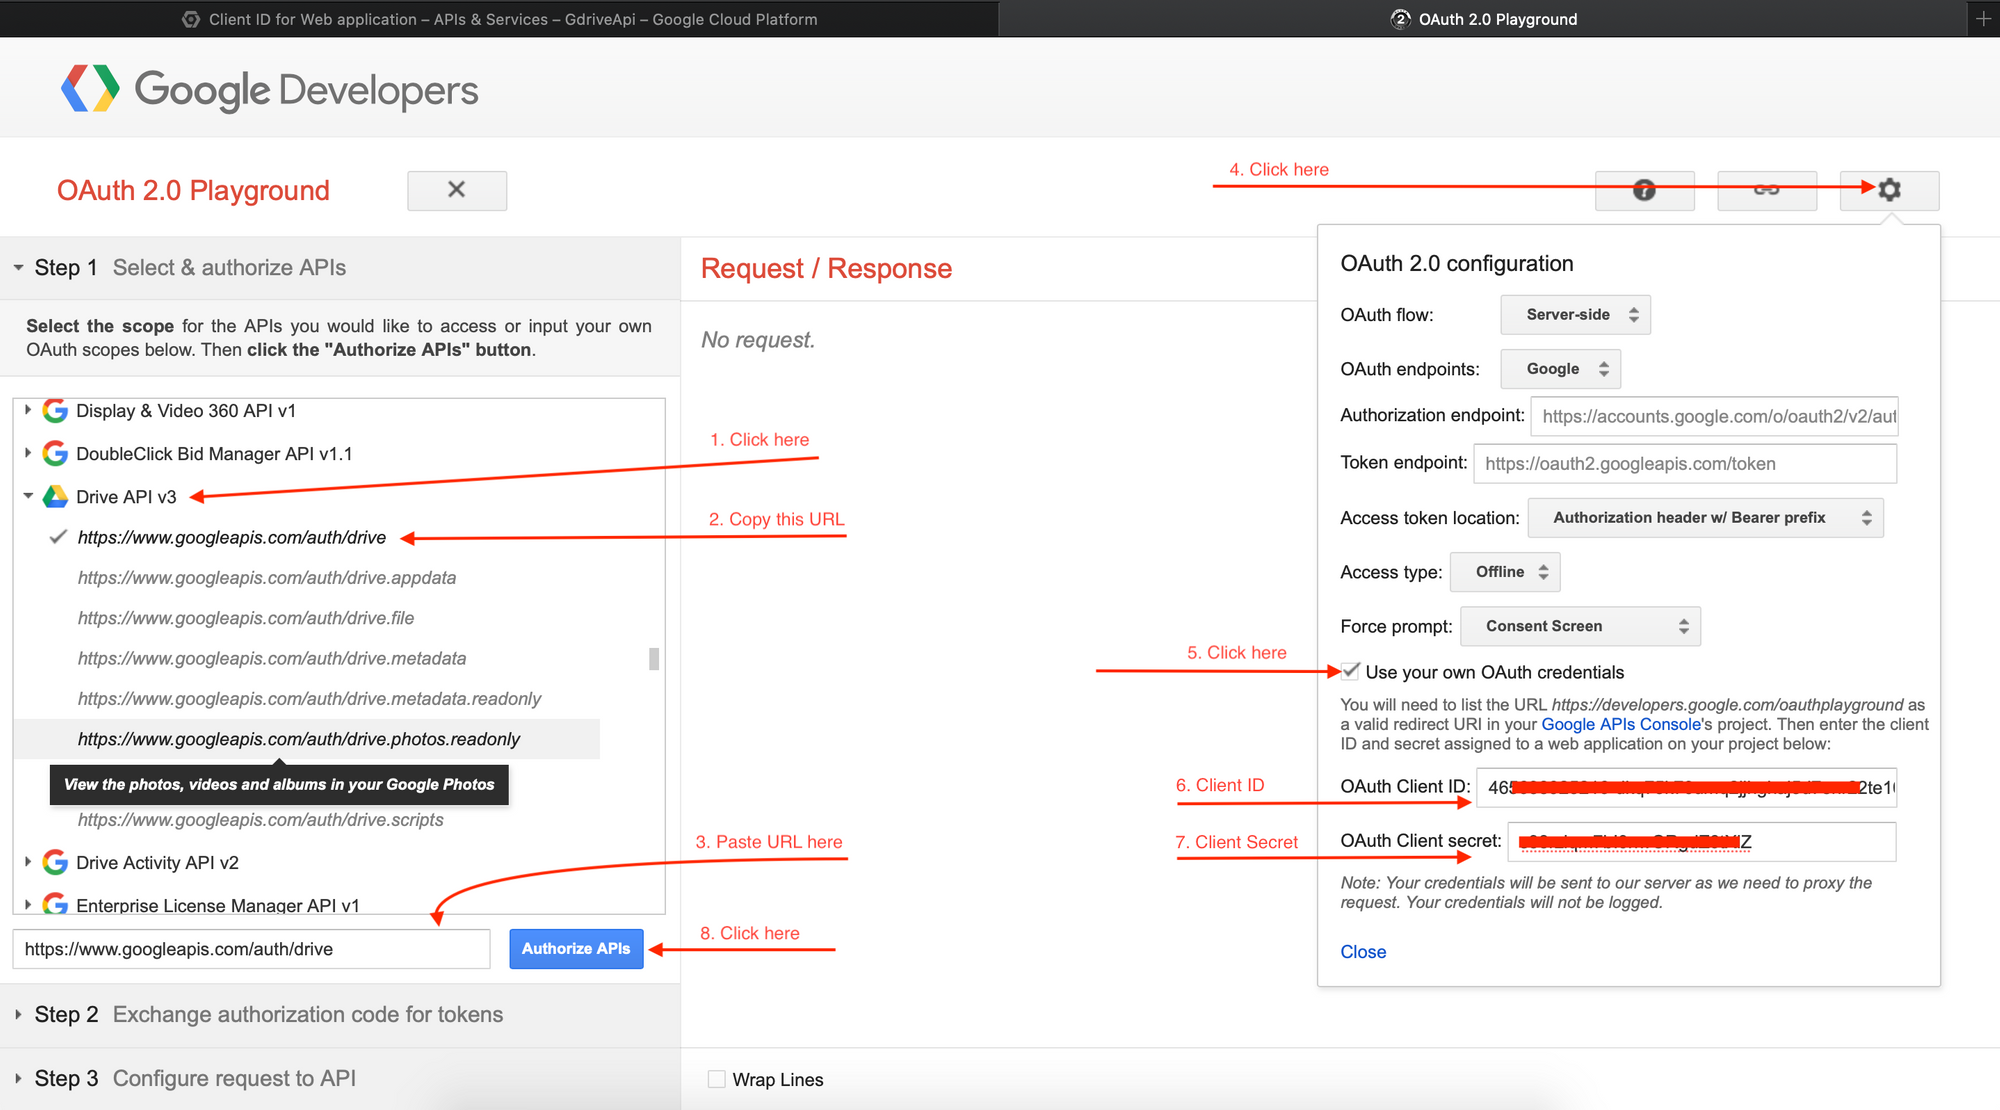
six. On the new page, click on the menu in the sidebar labeled "Credentials". On the next page, locate the drop-down push labeled "CREATE CREDENTIALS" click on it and select the drop-downward menu labeled "OAuth client ID"
On the next page, select "Web Awarding" as the value of the input labeled "Application type,"
Give a name to our Web Application.
In the section "Authorized redirect URIs," click on "ADD URI" and fill up the input with this value: https://developers.google.com/oauthplayground
Click on "CREATE" to submit, and hooray 🎉 , we have our Client ID and Customer Secret.
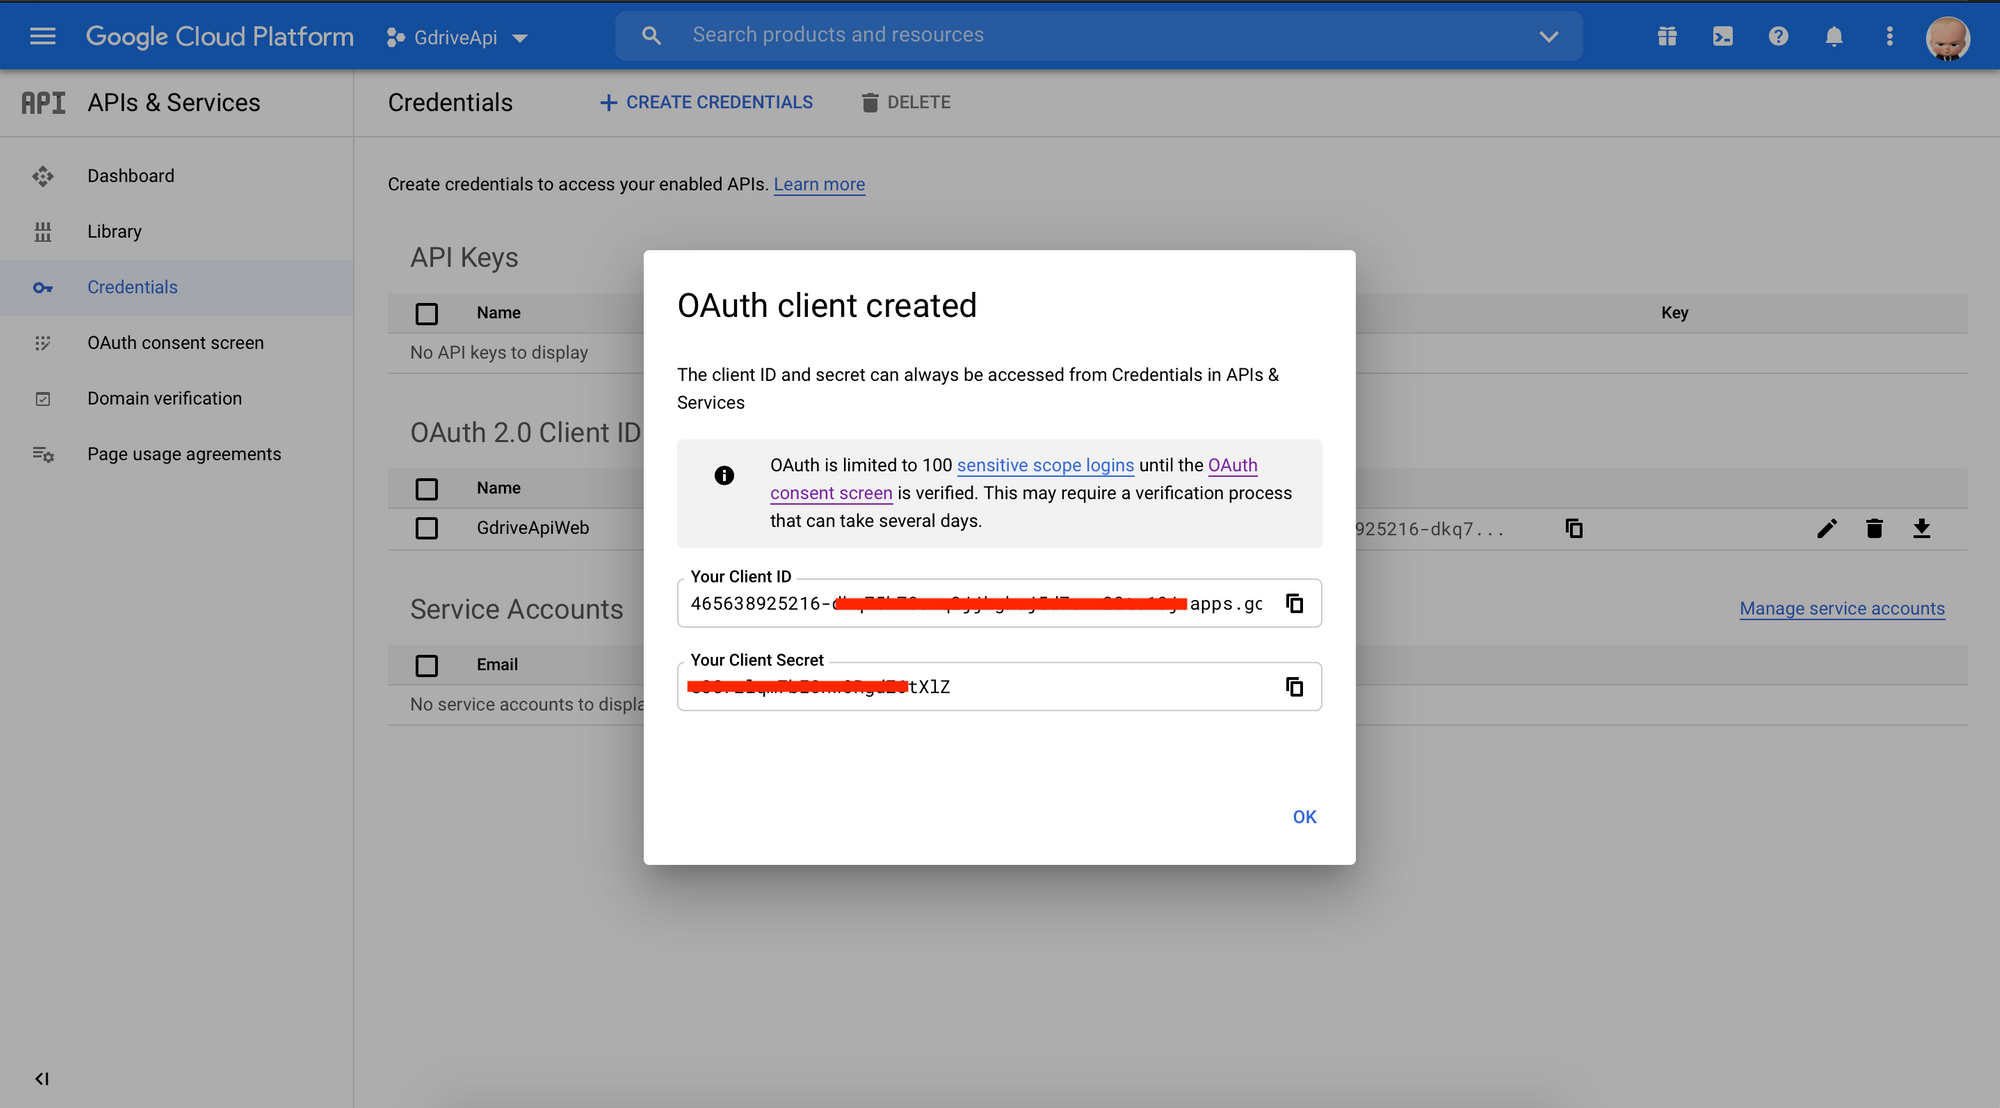
At this step, we already have:
- Customer ID ✅
- Client Underground ✅
- Redirect URI ✅ (https://developers.google.com/oauthplayground)
- Refresh Token ❌
seven. Allow's get the refresh token.
Go to https://developers.google.com/oauthplayground
You volition be redirected to our Google Account to authorize the app to access our Google Drive.
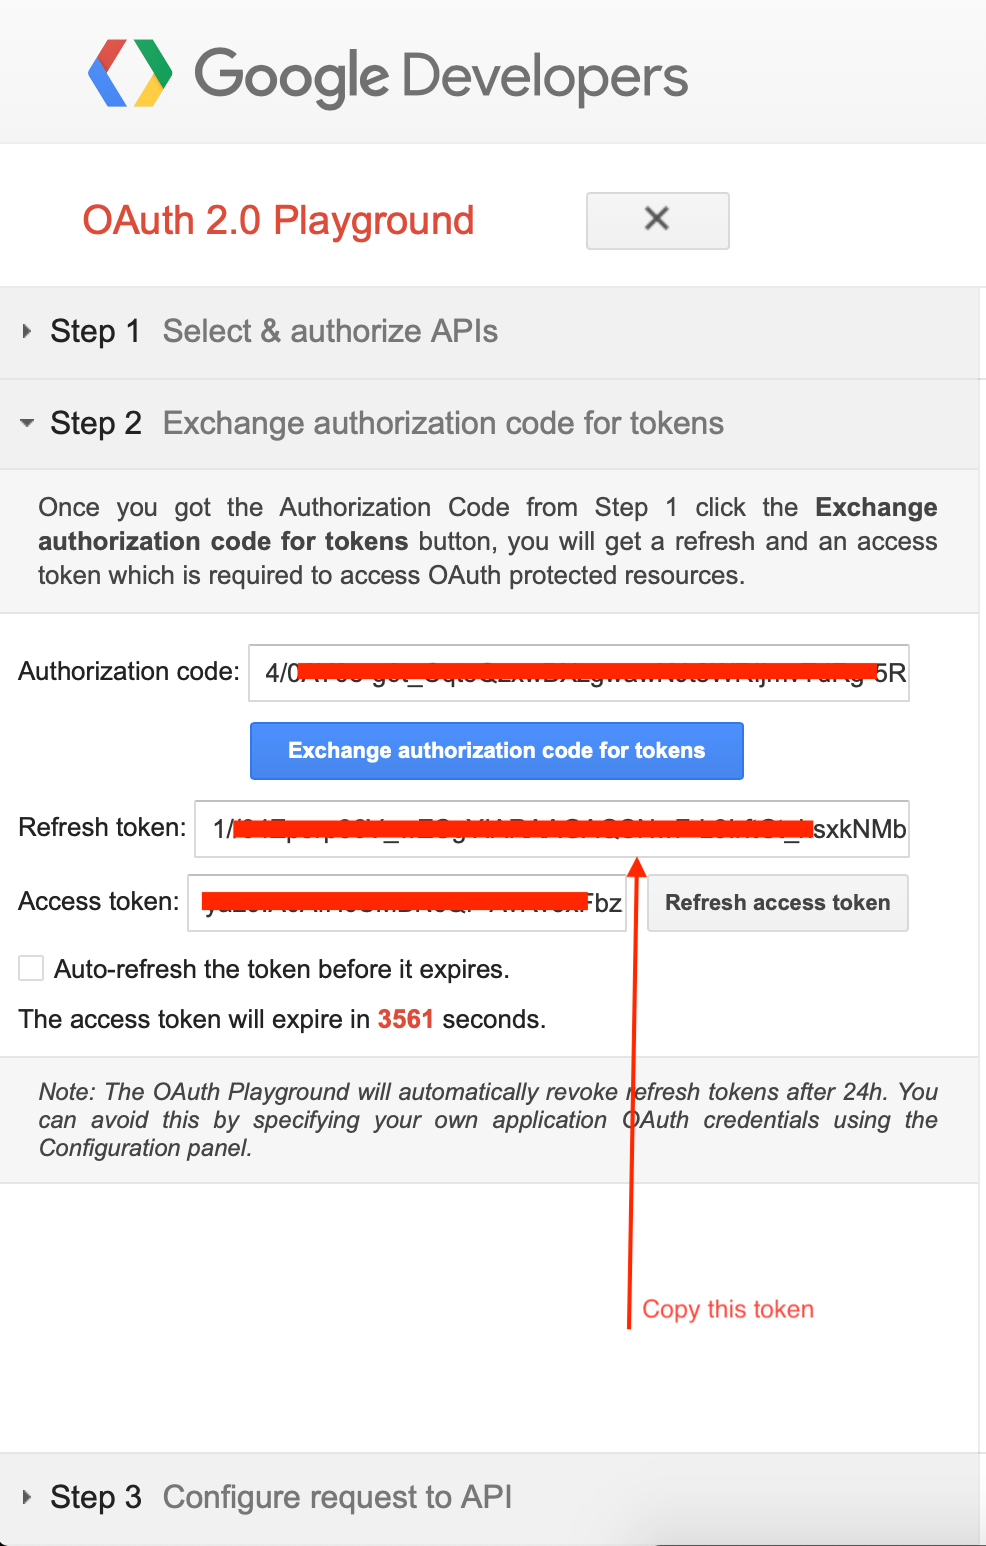
Authorize, and yous will be redirected to a page with the content below:
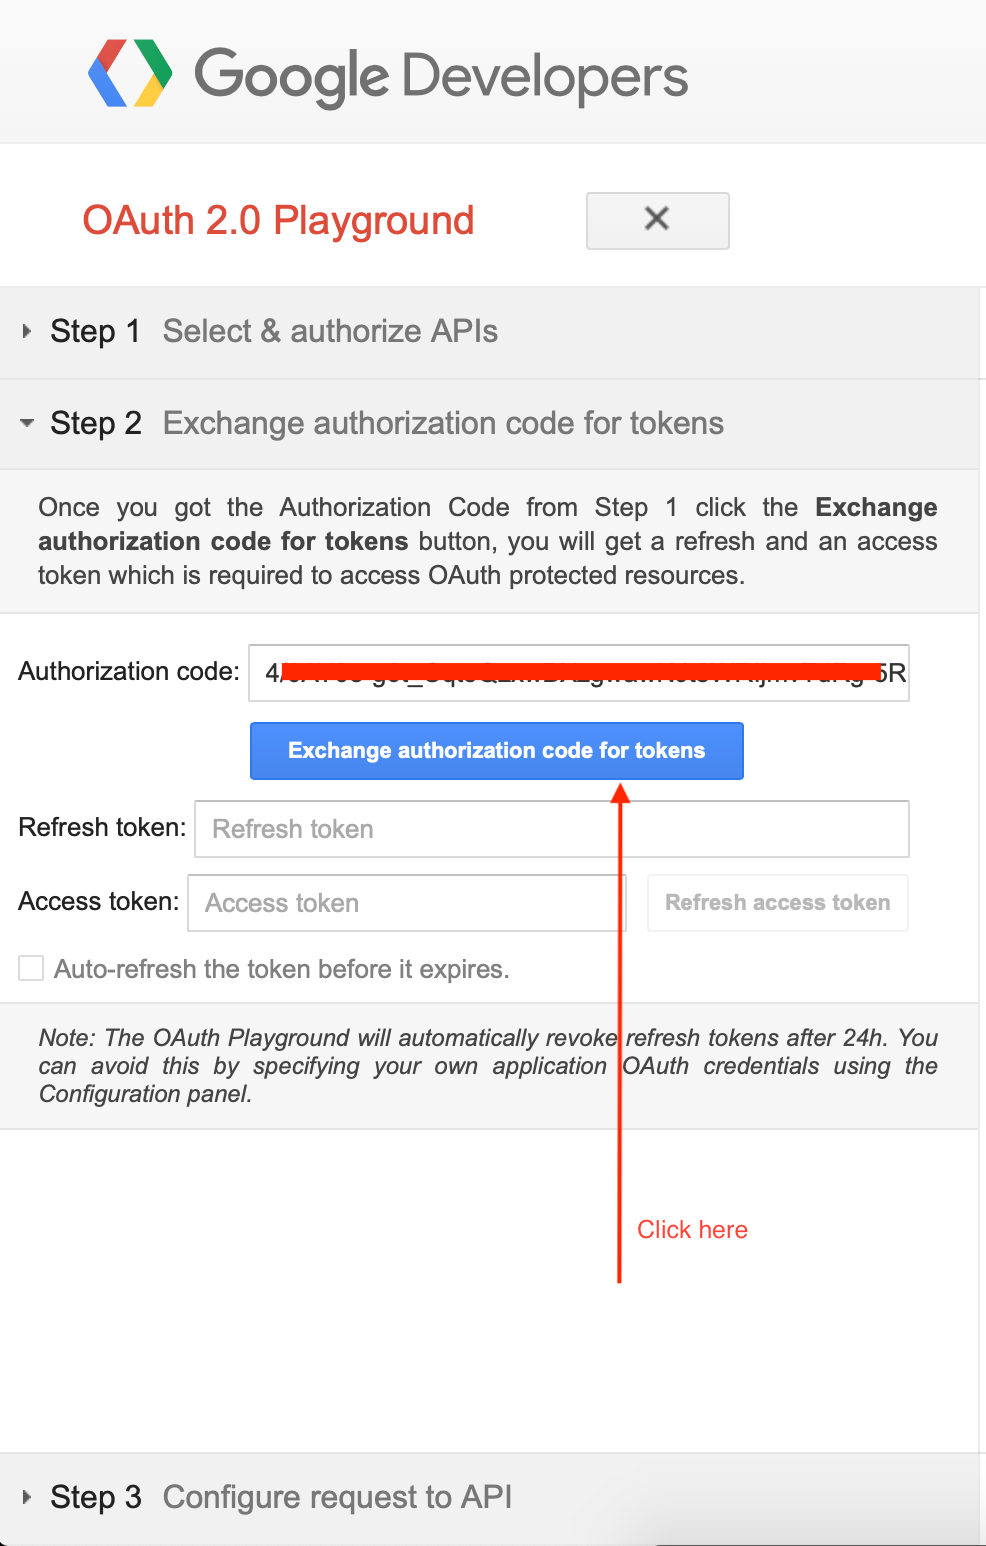
When the request is completed, you will have your refresh token 🎉.
Project construction
We have everything to outset collaborate with Google Drive API. We will use the Node.js project already set upward with Typescript that nosotros created throughout this previous tutorial so, clone the repository at this link so go within.
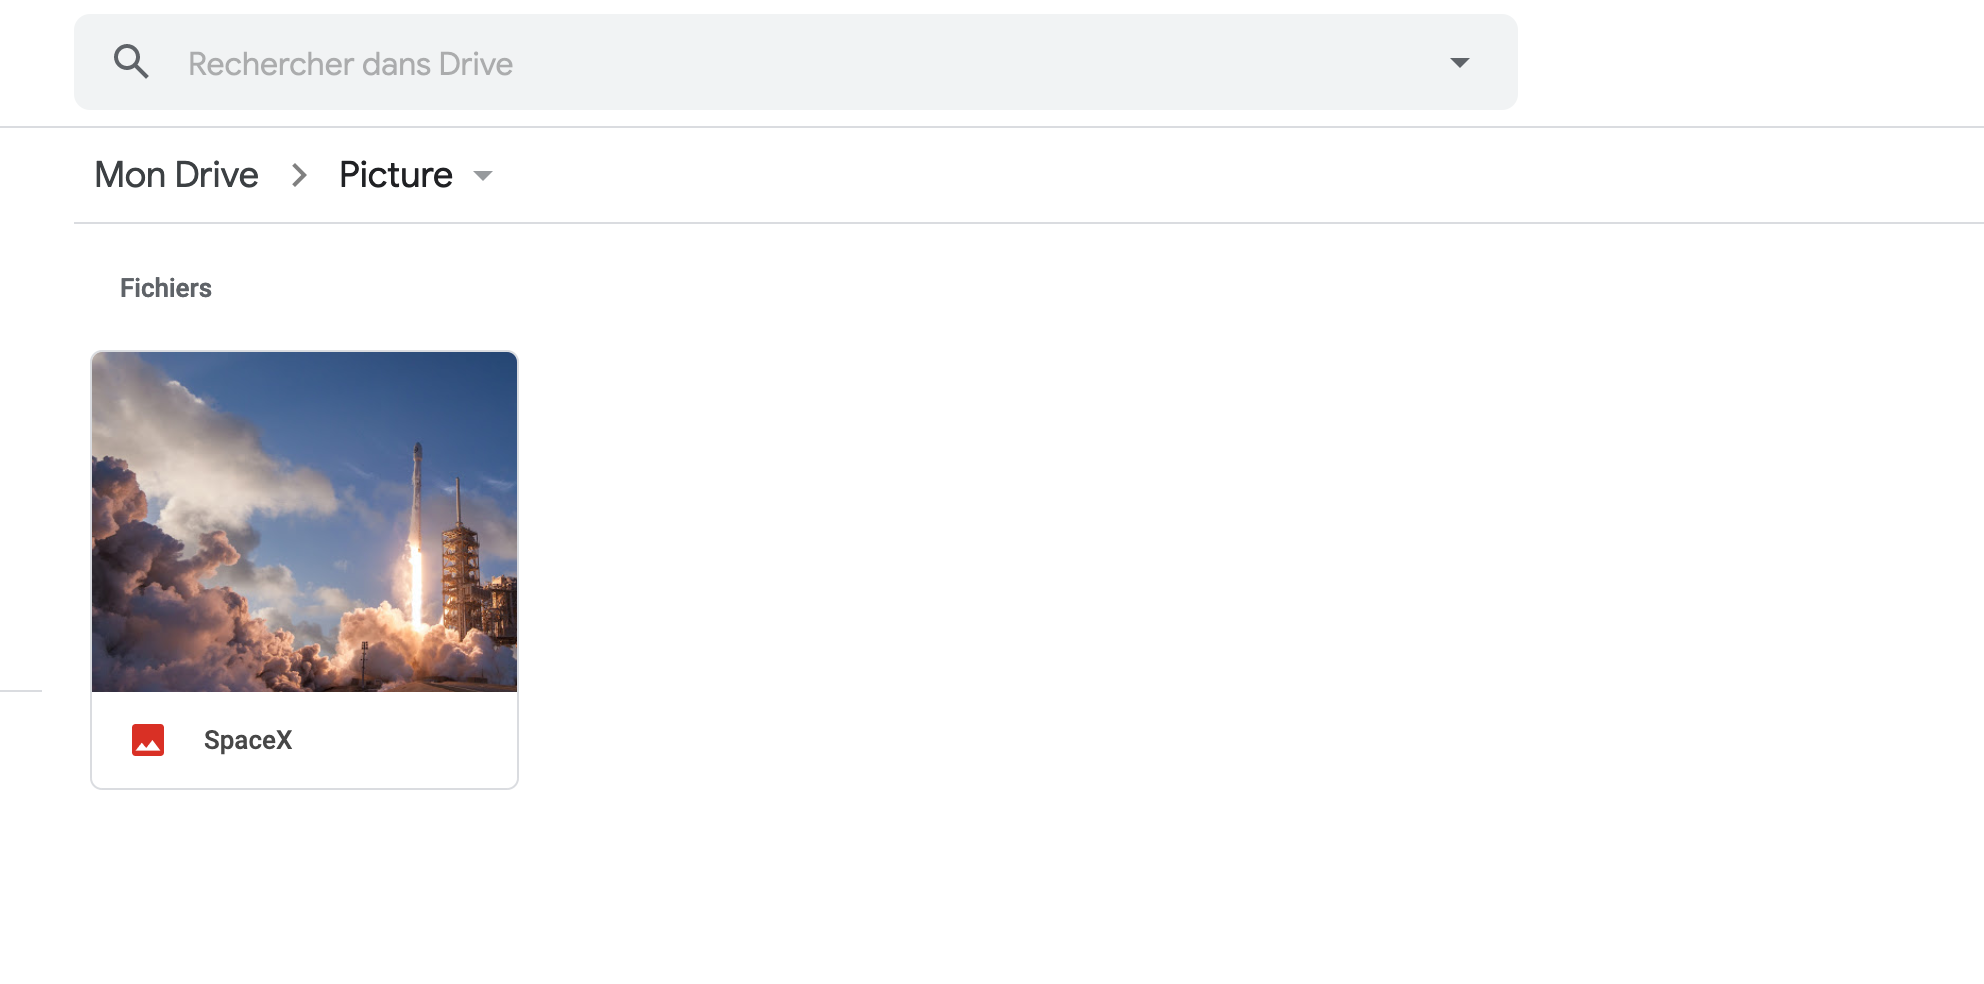
git clone https://github.com/tericcabrel/node-ts-starter.git node-gdrive-api cd node-gdrive-api At the root folder, create a directory named "public" and copy a picture file inside, which volition be uploaded to Google Drive. I took this picture on Unsplash by SpaceX.
├── public │ ├── spacex-uj3hvdfQujI-unsplash.jpg ├── src │ ├── index.ts ├── .eslintrc.js ├── .prettierrc.js ├── README.physician ├── bundle.json ├── tsconfig.json └── yarn.lock Setup surround variables
Nosotros demand the credentials we created previously to interact with Google Bulldoze API and to avoid using them in raw, we need to load them from a configuration file. We will use the dotenv packet; we also need the Node.js SDK for Google API. So, within the terminal at the projection root, run the code below to install them:
yarn install yarn add dotenv googleapis yarn add together -D @types/node Create a file named .env then add together the content below:
GOOGLE_DRIVE_CLIENT_ID=<YOUR_CLIENT_ID> GOOGLE_DRIVE_CLIENT_SECRET=<YOUR_CLIENT_SECRET> GOOGLE_DRIVE_REDIRECT_URI=https://developers.google.com/oauthplayground GOOGLE_DRIVE_REFRESH_TOKEN=<YOUR_REFRESH_TOKEN> Open up src/index.ts and type the code below save and run the code yarn start to see the result:
import dotenv from 'dotenv'; dotenv.config(); panel.log(process.env.GOOGLE_DRIVE_CLIENT_ID); console.log(process.env.GOOGLE_DRIVE_CLIENT_SECRET); console.log(procedure.env.GOOGLE_DRIVE_REDIRECT_URI); console.log(process.env.GOOGLE_DRIVE_REFRESH_TOKEN); Interact with Google Drive API
Nosotros will create a file named googleDriveService which iv methods:
- createDriveClient(): create a customer with the credentials generated before, and we will use it to brand calls to Google Bulldoze API
- searchFolder(): Search a binder inside Google Drive.
- createFolder(): Create a new folder within Google Drive
- saveFile(): Create a new file in a folder within Google Drive
import fs from 'fs'; // eslint-disable-next-line @typescript-eslint/no-var-requires const { google } = require('googleapis'); /** * Browse the link below to run across the complete object returned for folder/file cosmos and search * * @link https://developers.google.com/drive/api/v3/reference/files#resource */ type PartialDriveFile = { id: string; name: string; }; type SearchResultResponse = { kind: 'drive#fileList'; nextPageToken: string; incompleteSearch: boolean; files: PartialDriveFile[]; }; export class GoogleDriveService { private driveClient; public constructor(clientId: string, clientSecret: string, redirectUri: cord, refreshToken: string) { this.driveClient = this.createDriveClient(clientId, clientSecret, redirectUri, refreshToken); } createDriveClient(clientId: string, clientSecret: string, redirectUri: string, refreshToken: string) { const client = new google.auth.OAuth2(clientId, clientSecret, redirectUri); customer.setCredentials({ refresh_token: refreshToken }); return google.drive({ version: 'v3', auth: client, }); } createFolder(folderName: string): Promise<PartialDriveFile> { return this.driveClient.files.create({ resource: { proper name: folderName, mimeType: 'awarding/vnd.google-apps.folder', }, fields: 'id, name', }); } searchFolder(folderName: cord): Promise<PartialDriveFile | null> { render new Hope((resolve, reject) => { this.driveClient.files.list( { q: `mimeType='awarding/vnd.google-apps.folder' and name='${folderName}'`, fields: 'files(id, proper name)', }, (err, res: { information: SearchResultResponse }) => { if (err) { render refuse(err); } return resolve(res.data.files ? res.information.files[0] : zip); }, ); }); } saveFile(fileName: string, filePath: cord, fileMimeType: cord, folderId?: string) { render this.driveClient.files.create({ requestBody: { name: fileName, mimeType: fileMimeType, parents: folderId ? [folderId] : [], }, media: { mimeType: fileMimeType, torso: fs.createReadStream(filePath), }, }); } } Now let's use the GoogleDriveService in our alphabetize.ts file and so supercede the content by the one beneath:
import dotenv from 'dotenv'; import * as path from 'path'; import * as fs from 'fs'; import { GoogleDriveService } from './googleDriveService'; dotenv.config(); const driveClientId = process.env.GOOGLE_DRIVE_CLIENT_ID || ''; const driveClientSecret = process.env.GOOGLE_DRIVE_CLIENT_SECRET || ''; const driveRedirectUri = procedure.env.GOOGLE_DRIVE_REDIRECT_URI || ''; const driveRefreshToken = procedure.env.GOOGLE_DRIVE_REFRESH_TOKEN || ''; (async () => { const googleDriveService = new GoogleDriveService(driveClientId, driveClientSecret, driveRedirectUri, driveRefreshToken); const finalPath = path.resolve(__dirname, '../public/spacex-uj3hvdfQujI-unsplash.jpg'); const folderName = 'Pic'; if (!fs.existsSync(finalPath)) { throw new Error('File not plant!'); } let folder = await googleDriveService.searchFolder(folderName).catch((error) => { console.error(fault); render aught; }); if (!folder) { folder = await googleDriveService.createFolder(folderName); } await googleDriveService.saveFile('SpaceX', finalPath, 'paradigm/jpg', folder.id).grab((error) => { console.error(error); }); console.info('File uploaded successfully!'); // Delete the file on the server fs.unlinkSync(finalPath); })(); Blazon yarn start to kickoff the awarding and see the result:
You can found the source lawmaking of this tutorial at this link.
I hope you find information technology helpful; follow me on Twitter for more content.
Source: https://blog.tericcabrel.com/upload-file-to-google-drive-with-nodejs/
0 Response to "Google Drive When I Upload a Folder the Files Are Missing"
Post a Comment